Create News Items
You now know how you can read data from a database using CodeIgniter, but you haven’t written any information to the database yet. In this section, you’ll expand your news controller and model created earlier to include this functionality.
Enable CSRF Filter
Before creating a form, let’s enable the CSRF protection.
Open the app/Config/Filters.php file and update the $methods property like the following:
<?php

namespace Config;

use CodeIgniter\Config\BaseConfig;

class Filters extends BaseConfig
{
    // ...

    public $methods = [
        'post' => ['csrf'],
    ];

    // ...
}
It configures the CSRF filter to be enabled for all POST requests. You can read more about the CSRF protection in Security library.
Warning
In general, if you use $methods filters, you should disable Auto Routing (Legacy)
because Auto Routing (Legacy) permits any HTTP method to access a controller.
Accessing the controller with a method you don’t expect could bypass the filter.
Create a Form
View
To input data into the database, you need to create a form where you can input the information to be stored. This means you’ll be needing a form with two fields, one for the title and one for the text. You’ll derive the slug from our title in the model. Create a new view at app/Views/news/create.php:
<h2><?= esc($title) ?></h2>

<?= session()->getFlashdata('error') ?>
<?= validation_list_errors() ?>

<form action="/news/create" method="post">
    <?= csrf_field() ?>

    <label for="title">Title</label>
    <input type="input" name="title" value="<?= set_value('title') ?>">
    <br>

    <label for="body">Text</label>
    <textarea name="body" cols="45" rows="4"><?= set_value('body') ?></textarea>
    <br>

    <input type="submit" name="submit" value="Create news item">
</form>
There are probably only four things here that look unfamiliar.
The session() function is used to get the Session object,
and session()->getFlashdata('error') is used to display the error related to CSRF protection
to the user. However, by default, if a CSRF validation check fails, an exception will be thrown,
so it does not work yet. See Redirection on Failure for more information.
The validation_list_errors() function provided by the Form Helper
is used to report errors related to form validation.
The csrf_field() function creates a hidden input with a CSRF token that helps protect against some common attacks.
The set_value() function provided by the Form Helper is used to show
old input data when errors occur.
Controller
Go back to your News controller. You’re going to do two things here, check whether the form was submitted and whether the submitted data passed the validation rules. You’ll use the validation method in Controller to do this.
<?php

namespace App\Controllers;

use App\Models\NewsModel;

class News extends BaseController
{
    // ...

    public function create()
    {
        helper('form');

        // Checks whether the form is submitted.
        if (! $this->request->is('post')) {
            // The form is not submitted, so returns the form.
            return view('templates/header', ['title' => 'Create a news item'])
                . view('news/create')
                . view('templates/footer');
        }

        $post = $this->request->getPost(['title', 'body']);

        // Checks whether the submitted data passed the validation rules.
        if (! $this->validateData($post, [
            'title' => 'required|max_length[255]|min_length[3]',
            'body'  => 'required|max_length[5000]|min_length[10]',
        ])) {
            // The validation fails, so returns the form.
            return view('templates/header', ['title' => 'Create a news item'])
                . view('news/create')
                . view('templates/footer');
        }

        $model = model(NewsModel::class);

        $model->save([
            'title' => $post['title'],
            'slug'  => url_title($post['title'], '-', true),
            'body'  => $post['body'],
        ]);

        return view('templates/header', ['title' => 'Create a news item'])
            . view('news/success')
            . view('templates/footer');
    }
}
The code above adds a lot of functionality.
First we load the Form helper with the helper() function.
Most helper functions require the helper to be loaded before use.
Next, we check if we deal with the POST request with the
IncomingRequest object $this->request.
It is set in the controller by the framework.
The IncomingRequest::is() method checks the type of the request.
Since the route for create() endpoint handles both: GET and POST requests we can safely assume that if the request is not POST then it is a GET type.
the form is loaded and returned to display.
Then, we get the necessary items from the POST data by the user and set them in the $post variable.
We also use the IncomingRequest object $this->request.
After that, the Controller-provided helper function validateData()
is used to validate $post data.
In this case, the title and body fields are required and in the specific length.
CodeIgniter has a powerful validation library as demonstrated
above. You can read more about the Validation library.
If the validation fails, the form is loaded and returned to display.
If the validation passed all the rules, the NewsModel is loaded and called. This takes care of passing the news item into the model. The save() method handles inserting or updating the record automatically, based on whether it finds an array key matching the primary key.
This contains a new function url_title(). This function -
provided by the URL helper - strips down
the string you pass it, replacing all spaces by dashes (-) and makes
sure everything is in lowercase characters. This leaves you with a nice
slug, perfect for creating URIs.
After this, view files are loaded and returned to display a success message. Create a view at app/Views/news/success.php and write a success message.
This could be as simple as:
<p>News item created successfully.</p>
Model Updating
The only thing that remains is ensuring that your model is set up
to allow data to be saved properly. The save() method that was
used will determine whether the information should be inserted
or if the row already exists and should be updated, based on the presence
of a primary key. In this case, there is no id field passed to it,
so it will insert a new row into it’s table, news.
However, by default the insert and update methods in the Model will
not actually save any data because it doesn’t know what fields are
safe to be updated. Edit the NewsModel to provide it a list of updatable
fields in the $allowedFields property.
<?php

namespace App\Models;

use CodeIgniter\Model;

class NewsModel extends Model
{
    protected $table = 'news';

    protected $allowedFields = ['title', 'slug', 'body'];
}
This new property now contains the fields that we allow to be saved to the
database. Notice that we leave out the id? That’s because you will almost
never need to do that, since it is an auto-incrementing field in the database.
This helps protect against Mass Assignment Vulnerabilities. If your model is
handling your timestamps, you would also leave those out.
Routing
Before you can start adding news items into your CodeIgniter application
you have to add an extra rule to app/Config/Routes.php file. Make sure your
file contains the following. This makes sure CodeIgniter sees create()
as a method instead of a news item’s slug. You can read more about different
routing types in URI Routing.
<?php

// ...

use App\Controllers\News;
use App\Controllers\Pages;

$routes->match(['get', 'post'], 'news/create', [News::class, 'create']);
$routes->get('news/(:segment)', [News::class, 'view']);
$routes->get('news', [News::class, 'index']);
$routes->get('pages', [Pages::class, 'index']);
$routes->get('(:segment)', [Pages::class, 'view']);

// ...
Now point your browser to your local development environment where you
installed CodeIgniter and add /news/create to the URL.
Add some news and check out the different pages you made.


Congratulations
You just completed your first CodeIgniter4 application!
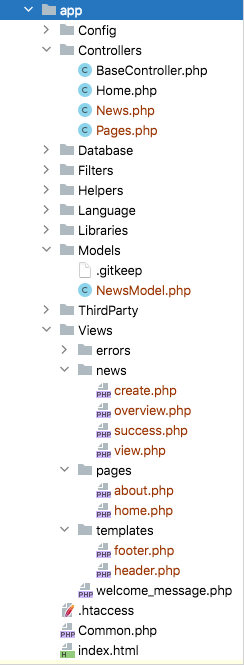
The image underneath shows your project’s app folder, with all of the files that you created in red. The two modified configuration files (Config/Routes.php & Config/Filters.php) are not shown.